Today we’re sharing part deux of our Beret Makeovers (if you missed it, you can find part un here!) This design is a bit more time intensive, but well worth it for the final result! It’s the perfect mini-project to keep your hands busy while you watch a movie — Paris, Je t’Aime, perhaps? Full instructions below!


Embroidered Beret
Materials Needed: Beret, printout of text design, small embroidery hoop, tape, embroidery thread, embroidery needle
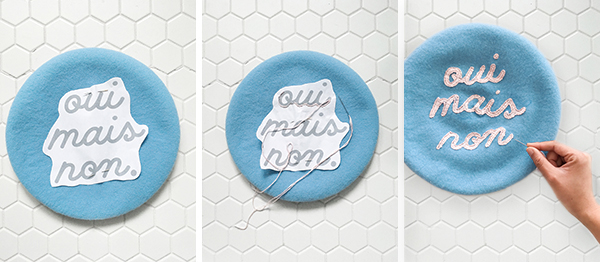
Step 1: Print out the text onto a sheet of paper, then cut out, leaving a border around the design.
Step 2: Secure the beret into the embroidery hoop. Then, center the design onto the fabric and tape down to secure.
Step 3: Use a needle and embroidery thread to create a border around each letter. Fill in the text design using a satin stitch. Once the design is filled, remove the paper to reveal your embroidery.
Step 4: Remove the beret from the embroidery hoop and you’re all set!


Crafting by Andrea Ramirez
Styling & Photography by Naomi Julia Satake
SHOP THE POST: Honeycomb, giant confetti, streamer garland, balloons